Crosspic: Free Cross Stitch Pattern Maker and Chart Guide
Discover Crosspic's free cross stitch pattern maker: turn images into DMC charts, edit stitches, simplify colors, and export printable PDFs without an account.
A favorite photograph, a small drawing, or a flower you keep sketching can become a project for your next quiet afternoon with a needle and thread. The difficult part is translating that idea into a clear grid, a sensible thread palette, and instructions you can actually follow.
Crosspic is a free, browser-based cross stitch pattern maker that brings those steps together. You can convert an image, draw a design from scratch, refine individual stitches, and export a printable chart. You do not need an account or a desktop software installation to begin.
This guide explains what Crosspic does, how its tools fit together, and when it is a good choice for your project. The product screenshots below were captured on crosspic.com using its original Sunflower study sample.
What is Crosspic, and who is it for?
Crosspic is a workspace for creating counted cross stitch patterns. A counted chart describes where stitches go on a fabric grid, with colors and symbols identifying the thread to use. Crosspic helps you design that chart and prepare it for stitching.
You can use it for a small motif, a handmade gift, an original illustration, or a photo-based project. Beginners can start with a simple blank canvas or a sample. More experienced makers can edit stitch types, add backstitch, refine palettes, and choose how their printed charts are arranged.
It is useful to distinguish a design tool from a finished-pattern collection. Crosspic gives you tools to make and change your own designs. If you would prefer to start stitching immediately, the blog also has a free unicorn cross-stitch pattern with a downloadable PDF.
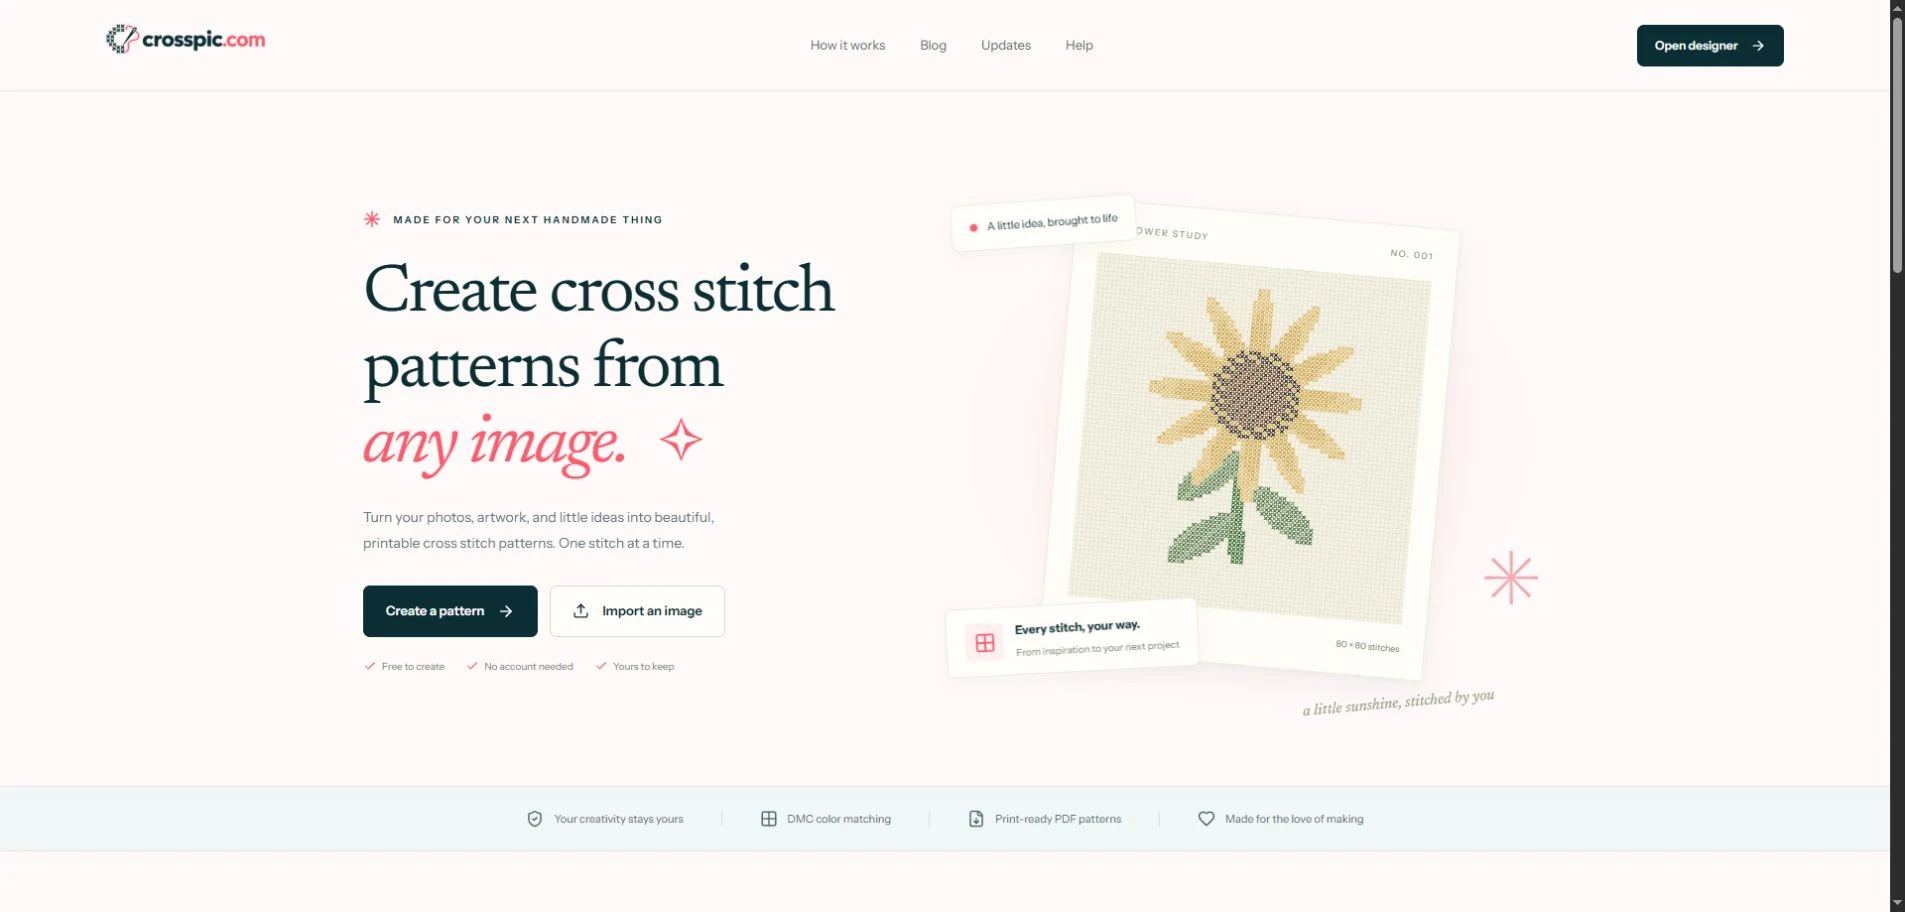
Two starting points on the homepage: create a blank pattern or import an image.
A cross stitch pattern maker, chart maker, and template maker in one
Different names often describe different parts of the same task. A cross stitch chart generator converts an image into a stitch grid. A cross stitch chart maker gives you ways to adjust that grid and prepare a readable chart. A cross stitch template maker helps you establish a repeatable starting point for your own designs.
Crosspic covers all three workflows. Start with an image when you have artwork to translate. Start with a blank grid when you want to draw directly. Duplicate a project in your library when you want to reuse a layout and explore a new color scheme without losing the first version.
The benefit is continuity: the generated chart remains editable. You can remove a stray stitch, redraw an edge, merge two similar colors, and then export the revised version from the same workspace.
Turn an image into a cross stitch pattern
Open Crosspic's image converter and choose a JPG, PNG, or WebP file. Image conversion runs in your browser. During ordinary editor use, your source image is not uploaded to a Crosspic server.
Choose an image with a clear focal point
A subject with a recognizable silhouette is a useful first experiment. A flower against a simple background or a bold illustration gives you fewer competing details to manage than a busy photograph.
Crop closely enough that the subject uses the available stitches. Imagine fitting a pet and an entire garden into an 80-stitch-wide grid: the face may receive only a few cells. Cropping around the head gives those same 80 columns a more useful job.
Crosspic's import workflow includes crop, pan, zoom, and rotation controls. Use them to decide what belongs in the design before you judge the conversion. A stronger crop can help more than simply increasing the number of colors.
Set the stitch dimensions deliberately
The width and height in stitches determine the available detail. A larger grid offers more room for curves and shading, but it can also mean a longer stitching project. A smaller grid encourages simpler shapes and more selective detail.
For a first original motif, try a small grid and a few colors. For a photograph, compare the preview at different sizes before committing. Check the eyes, lettering, outlines, or other features that make the subject recognizable; those are the places where lost detail matters most.
Adjust the color limit and review the preview
Crosspic reduces the image to a limited palette and matches colors against its included DMC reference data. You can choose which floss colors to include and set a maximum color count.
More colors may retain subtle shading, but they can also introduce small scattered patches. Fewer colors can make a chart easier to organize, although excessive reduction may erase an important edge or shadow. Compare the whole design after each change instead of judging only a zoomed-in section.
Treat the conversion as a first draft. The most useful next step is often a short editing session, especially around faces, thin lines, and the boundary between the subject and its background.
Draw and edit stitches with control
You do not need an image to use Crosspic. The blank pattern creator lets you choose the canvas dimensions and fabric count before opening the editor. Current blank grids can be up to 500 by 500 stitches.
The pencil and brush place stitches, the eraser removes them, and Fill colors a connected area. Line and Rectangle are useful for geometric shapes and borders. The eyedropper selects a color already used in the design, so you can continue an existing section without hunting through the palette.
Selection tools help you move or repeat motifs. You can copy a flower, reposition a border section, or test a different arrangement. Undo and Redo let you compare experiments as you work.
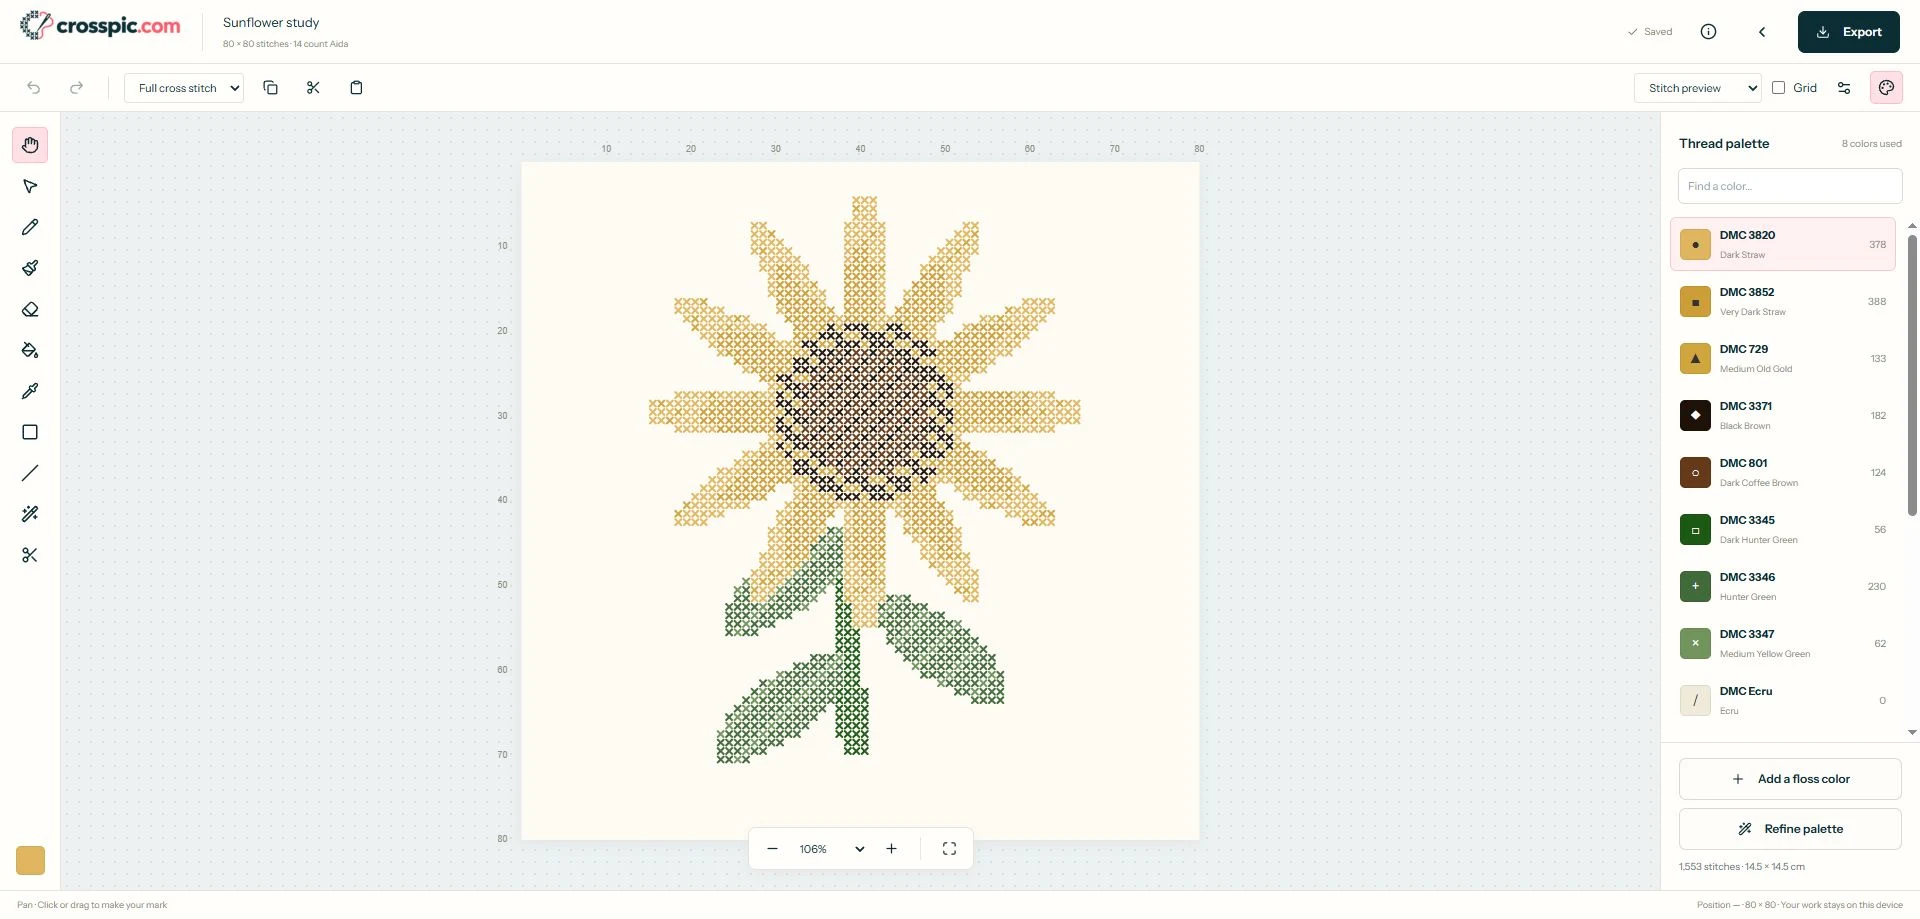
The sample uses eight thread colors and 1,553 stitches within an 80-by-80 grid. Empty cells remain part of the canvas without becoming filled stitches.
Crosspic supports full crosses, half stitches in both directions, quarter stitches, three-quarter stitches, petite stitches, French knots, and backstitch. You can keep a first project entirely in full crosses, then explore more detail when you have a reason to use it.
Backstitch is useful for emphasizing outlines or adding a linear detail. Check it together with the filled stitches so that the line supports the shape. For a guided first drawing exercise, follow Create Your First Cross-Stitch Pattern in Crosspic.
Make the thread palette easier to stitch
A pattern can look appealing on screen and still involve frequent thread changes. One of the reasons to choose an editable pattern maker is the ability to improve that practical side of the design.
Crosspic's thread palette displays DMC identifiers, color names, symbols, and stitch counts. Those counts help you notice a color used only a handful of times. Sometimes that tiny area is an essential highlight; sometimes it is conversion noise that you can simplify.
The Refine palette dialog provides controls for replacing a selected color, reducing the palette, merging rare or similar colors, and removing isolated stitches. Use these selectively. An isolated stitch could be unwanted speckling, but it could also be the eye of a small animal.
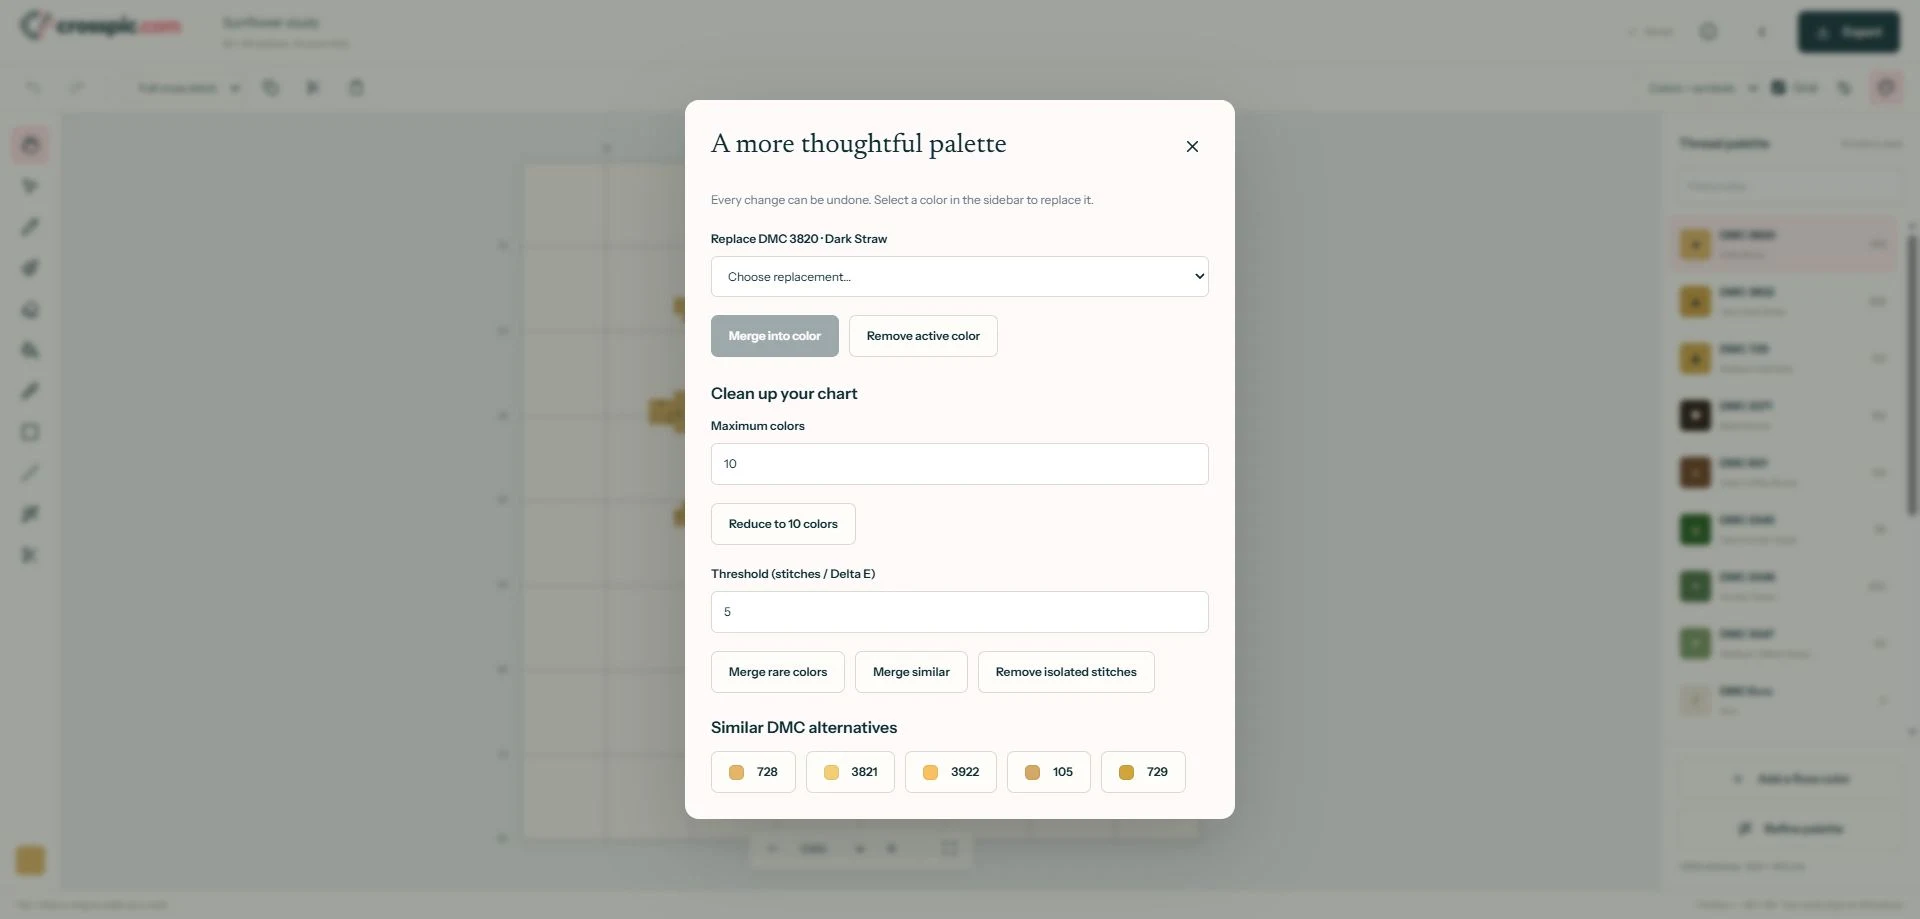
Palette cleanup can simplify a chart, but review the design after each operation to preserve intentional details.
A practical routine is to inspect the least-used colors, merge one unnecessary shade, and compare the result at a comfortable viewing size. Stop when further simplification changes the character of the design. Our guide to simplifying a cross-stitch color palette explains this approach in more detail.
Digital color matching is a starting point for thread selection. Compare important shades with physical floss or a thread card, particularly for skin tones and subtle neighboring colors. Crosspic's reference palette is adapted from the Stitchies thread-conversion dataset, which also explains the approximate nature of thread conversions. Crosspic is independent and is not affiliated with DMC.
See the design as stitches and as a counted chart
The stitched preview helps you assess the appearance of the design. The color, symbol, and combined views help you inspect its structure. Switching between them is useful because an attractive preview and a readable working chart serve different purposes.
In a combined chart, a cell has both a color and a symbol. That gives you a second way to distinguish nearby shades. Grid lines and numbered rulers help you locate stitches and check spacing.
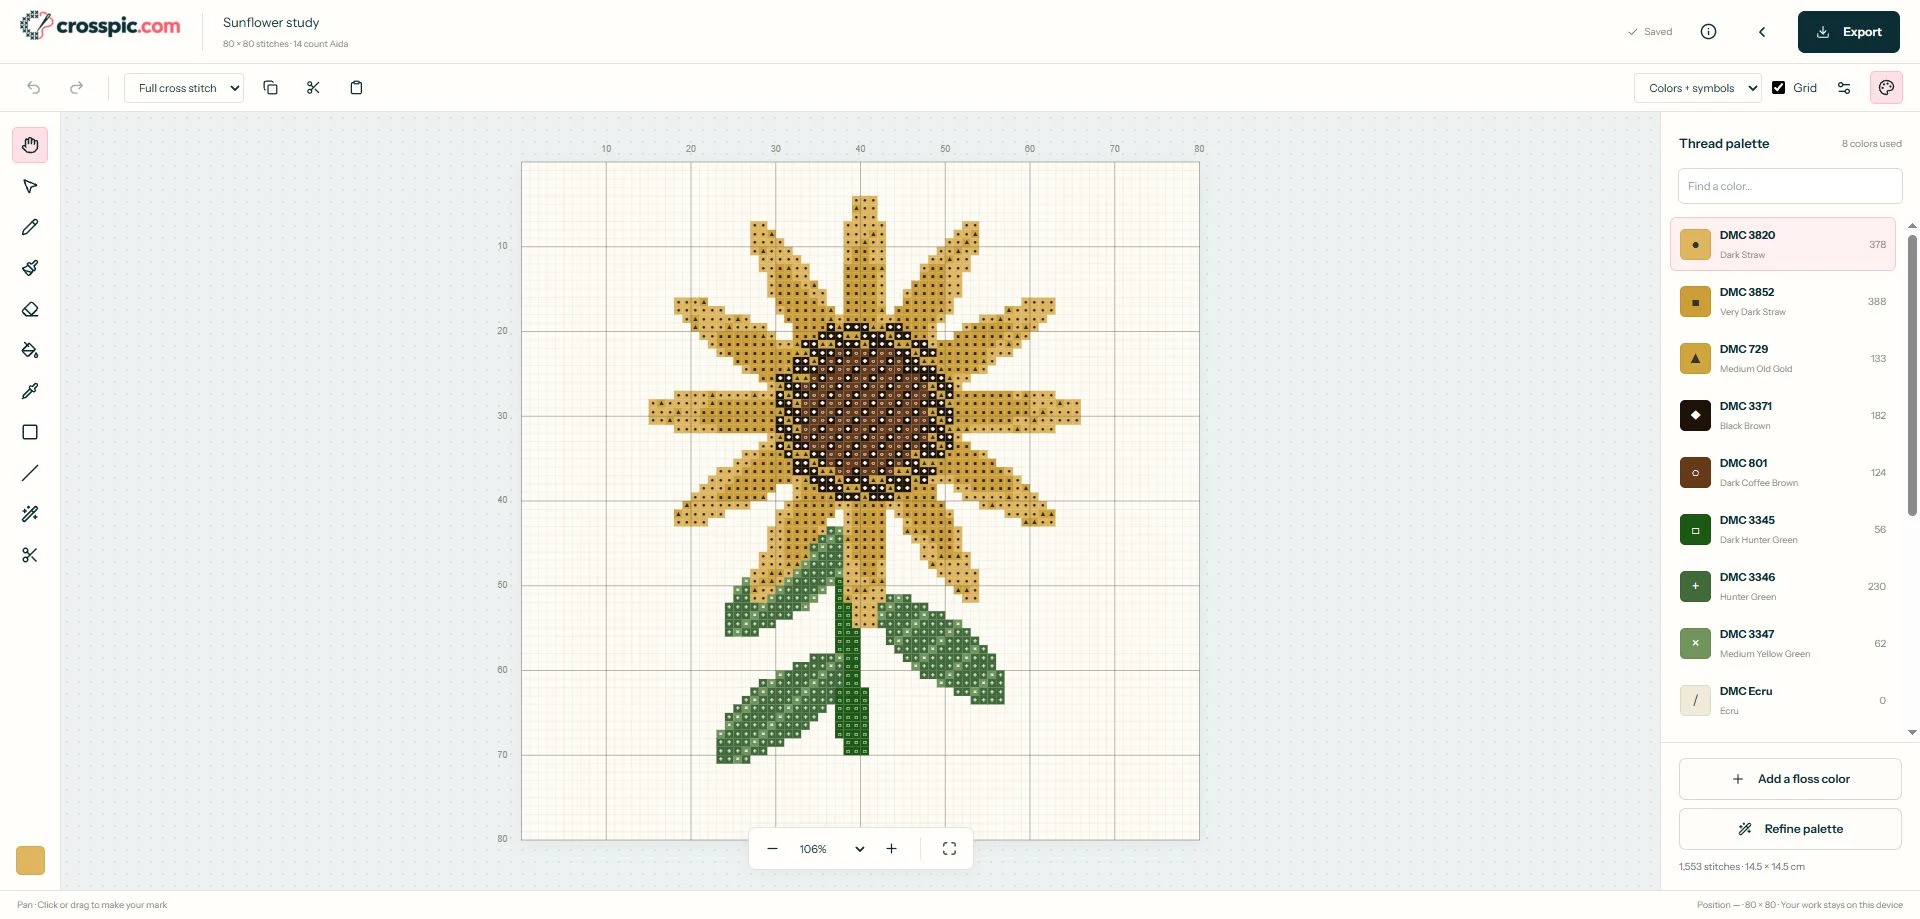
The same sunflower shown as a counted chart. Symbols connect the cells to the thread palette, while heavier grid lines divide the design into smaller areas to count.
If you are new to charts, begin with how to read a cross-stitch chart. For demonstrations of the physical stitching technique, DMC's cross-stitch tutorials provide videos and beginner guides covering starting, reading a chart, and making stitches.
Understand fabric count before choosing a finished size
A counted cross stitch pattern maker needs to connect the digital grid to the fabric you plan to use. Stitch dimensions and finished dimensions are related, but they are not the same measurement.
For full crosses worked over one square of Aida, divide the number of stitches by the fabric count to get the design dimension in inches. For example, an 80-stitch-wide chart on 14-count Aida spans approximately 5.71 inches, or 14.51 centimeters. On 16-count Aida, the same 80 stitches span 5 inches, or 12.7 centimeters.
| Chart dimensions | Aida count | Chart area before extra fabric |
|---|---|---|
| 80 × 80 stitches | 14 count | About 5.71 × 5.71 in / 14.51 × 14.51 cm |
| 80 × 80 stitches | 16 count | 5 × 5 in / 12.7 × 12.7 cm |
| 80 × 80 stitches | 18 count | About 4.44 × 4.44 in / 11.29 × 11.29 cm |
These measurements describe the full grid. A motif with empty space around it can occupy less of that area. They also exclude the extra fabric you need for handling and finishing. Check the margin required by your hoop, frame, or other finishing method before cutting fabric.
Changing the fabric count changes the physical size of a fixed chart; it does not add detail to the chart itself. If an imported face needs more definition, review the crop and stitch dimensions as well.
Export a printable PDF, a preview image, and an editable backup
Once the design is ready, Crosspic's export page gives you three useful kinds of file. Each has a different role in keeping and using your work.
PDF: your working chart
Choose A4 or US Letter, the page orientation, and a chart style. Options include color charts, black-and-white symbols, combined colors and symbols, and a stitched chart.
The booklet settings can include a cover, stitched preview, color and symbol keys, project preparation information, grid and page numbers, center arrows, and overlap between adjacent chart pages. Generate a preview and inspect the actual pages before downloading.
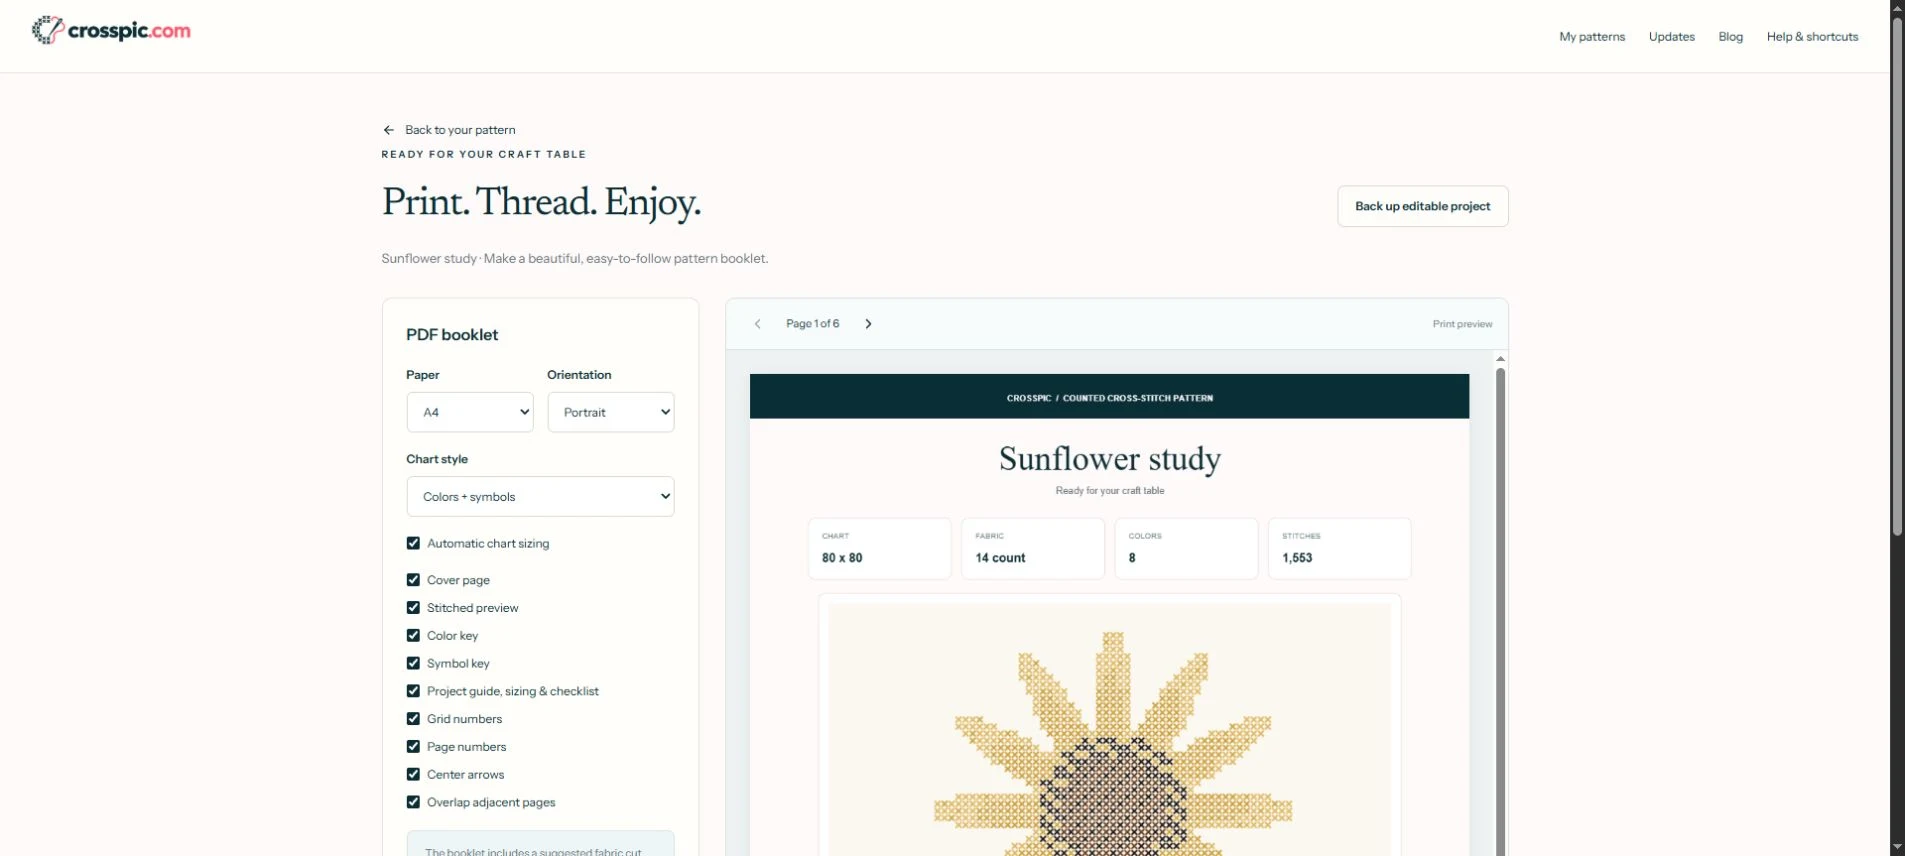
Check that the symbols remain readable at your intended print size. If the chart is divided across several pages, look at the page map and overlap so you understand how the sections join. The print preparation checklist walks through the final review.
Crosspic also provides floss estimates to help you plan materials. Treat those as estimates: stitching habits, travel between stitches, and specialty stitches affect consumption. Backstitch is not included in the current floss estimates, so allow for it separately.
PNG: a picture of the design
PNG export is useful for a visual reference or a preview you want to share. You can choose different display styles and a white or transparent background. Use a sufficiently clear chart export when you need symbols; a small decorative preview is not a substitute for a readable working chart.
.crosspic: the editable project
Download a .crosspic file to preserve the editable design, including its stitches, palette, backstitch, and retained source image. This is the file to keep when you want to return later and change the pattern.
Crosspic saves projects in the current browser, but that is not cloud synchronization. A different browser or device will not automatically have the same library. Clearing site data can remove saved projects. Export a backup after important work and import that file when moving to another device.
Why choose Crosspic instead of another workflow?
The strongest reason to choose Crosspic is that it combines conversion, editing, palette refinement, and export in a browser workspace you can try without registering. Whether that is the right fit depends on how you prefer to design.
| What matters for your project | How Crosspic helps | What to check before choosing |
|---|---|---|
| Starting quickly | Open the website and begin with a blank grid, sample, or local image. | Try a small project to see whether the controls suit you. |
| Improving a converted image | Edit individual stitches and refine the palette after conversion. | Expect to review details rather than treat conversion as a finished design. |
| Working with personal photos | Ordinary image conversion and pattern editing run locally in the browser. | Read the privacy policy for separate website services. |
| Printing a working chart | Preview configurable PDF booklets with chart keys and page guidance. | Check symbol size and page arrangement before printing. |
| Returning to an editable design | Keep browser-local projects and download .crosspic backups. |
Export files yourself for backup and device transfers. |
| Specialized design requirements | Use multiple stitch types and backstitch within the current editor. | Check the current limits against the techniques and file formats you need. |
Compared with drawing everything on paper, a digital editor makes it easier to revise a shape, replace a color across a pattern, or repeat a motif. Compared with a conversion-only workflow, Crosspic lets you improve the generated result before preparing the chart for printing.
If you already use a desktop program with specialist features, compare the specific functions you rely on. Crosspic currently limits grids to 500 by 500 stitches, uses fixed orientations for fractional stitches, and does not support independently colored layered quadrants in one cell. It also does not provide an automatically synchronized cloud project library.
Those are useful decision points. Crosspic is a good fit when you value an accessible browser workflow, direct stitch editing, and downloadable files. A project that depends on a particular advanced stitch construction, a larger canvas, or automatic device synchronization may need a different tool.
A practical first project: personalize the sunflower sample
You can explore the workflow without preparing a photograph. Open the Sunflower study sample, which creates an editable project in your browser.
- Look at the stitched preview and identify the petals, center, stem, and leaves.
- Switch to Colors + symbols and enable the grid to see how those shapes occupy the chart.
- Inspect the thread palette and the stitch count for each color.
- Duplicate the project from your library before experimenting with a different palette.
- Try a small edit, then compare the result in stitched and chart views.
- Generate a PDF preview and inspect the chart pages and key.
- Download an editable backup as well as your preferred chart file.
This exercise connects the tools to a real task: making a design your own while keeping a chart you can follow. After that, try a simple drawing or a carefully cropped photograph using the same review process.
Frequently asked questions
Starting with a photograph? The free photo to cross stitch pattern maker explains image cropping, stitch dimensions, and DMC color choices before you open the converter.
Is Crosspic free to use?
Yes. Crosspic currently provides its browser-based pattern creation, editing, and export tools for free, without requiring an account. You can open a sample to explore the workflow before starting your own project.
Can I make cross stitch patterns from photos?
Yes. Import a JPG, PNG, or WebP image, adjust the crop and stitch dimensions, choose a color limit, and review the conversion. Clear subjects and deliberate cropping make it easier to assess the result. You can edit the converted stitches afterward.
Can I use Crosspic as a cross stitch template maker?
Yes. Build a base design and duplicate it in your pattern library to reuse its layout. For example, keep a border as a starting point and experiment with different motifs inside it. Save separate editable backups for versions you want to retain.
Is “cross and stitch” the same as cross stitch?
People sometimes use “cross and stitch” when searching for cross stitch. In this guide, cross stitch means the counted needlework technique where X-shaped stitches form a design on a fabric grid. Crosspic helps you plan those stitches as a pattern and chart.
Does Crosspic upload my images or save projects online?
During ordinary editor use, image conversion runs locally and source images and pattern contents are not uploaded to a Crosspic server. Projects are saved in your current browser. Website delivery, analytics, and advertising are separate services described in the Crosspic Privacy Policy.
Which file should I save if I want to edit the pattern later?
Save the .crosspic project file. A PDF is useful for following the chart and a PNG is useful for viewing the design, but the project backup preserves the editable Crosspic data.
Bring your next idea to the grid
Start with a design small enough to review carefully. Give each color a purpose, check the chart as well as the preview, and save a backup before putting the project aside. Those habits help turn an interesting image into a pattern you will enjoy stitching.
Ready to try it? Create a blank cross-stitch pattern, turn an image into a chart, or visit the Crosspic help guide for tool instructions and keyboard shortcuts.